In continuation from our previous post on “Using Campaigns to Improve Sales Cycle” we now move into using Mautic campaigns to help the sales team follow up with leads that come in.
Firstly we consulted with our clients on their needs, and in a very general case what most of them wanted was for their sales to be able to get into work in the morning and see a list of prospects to call. Further discussing the “sales cycle” we determined that each sales call can result in a number of different outcomes:
- Sales agent called prospect and no answer
- Sales agent called prospect and more information was requested
- Sales agent called prospect and prospect requested a call back
- Sales agent called prospect and closed a deal
- Sales agent called prospect and prospect was not interested
Most sales people will call a potential prospect 3 times before moving them to the “not interested list”.
Making it Happen
There are two way to begin any campaign:
- When a visitor fills out a contact form
- From a segment
In our case we actually used both of these triggers to start the campaign. Client has a database that they want to send out a prospecting e-mail.
First we went and created a form to use on their landing page where they were purchasing traffic and sending leads to. We implemented the form on this page (we actually also implemented an Exit Intent Focus item as well, with the shortened form), we also created a new Segment called OnboardingDB.
Next we created a segment called “Follow-Up Today”. This segment was given public permissions so that each sales rep could see the segment in their segment list. This is a dynamic segment and contains the condition “Tag” include “follow-up”.
We then deliberated on how to best implement the tracking of the cycle, either to use stages, tags or a custom field. For us we found that a custom field was the most efficient way to implement our strategy.
As such we went ahead and created a custom field called “Lead Status” of type Select (We did have an internal discussion around using multi-select, but decided to use tags to represent the cycle itself.). Inside the Lead Status we provided the following Values:
- Not Answered-1
- Not Answered-2
- Not Answered-3
- Requested More Information
- Requested Call Back
- Deal Closed
- Not Interested
We set another custom field called “Call Back Date” of type Date.
We set another field called “Account Manager” again of type select and added the different account managers. On a side note, we could have also updated Contact Owner here that can also take care of this and can add amazing benefit when sending mails from Contact Owner, but in most of our cases, this was not required.

Both of these two fields we put into the group “Professional”. This little trick makes it much easier for an agent to see what is going on when viewing a contacts Details.

Building Out the Campaign
As mentioned the campaign is triggered either from a Form submission or a segment, in our case the Onboarding Segment.
The campaign was built using conditions based on Contact Field (“Lead Status”). At each point in the campaign depending on what the lead status is, the contact is either removed from the campaign entirely – in this case when a deal is closed or the contact is Not Interested.
At each stage in the campaign the contact is updated with one of the following tags, which in turn will be able to show a Sales Manager and assist the Sales Agent in the next actions or Lead Status to update:
- follow-up-today
- agent-called-na-1 (not answered 1)
- agent-called-na-2
- agent-called-na-3
- not-interested
- requested-more-information
- requested-call-back
An example of what a contacts card looks like during the sales cycle:

In the above picture, by looking at the tags on a contacts card we can see the following:
The sales agent has made two calls to the prospect and on the third call the prospect requested a call back. There are other tags which are letting us know about certain contact activity, but these are not relevant for the current discussion.
In all other stages the contact is then removed from the campaign by using an Action “Modify Contacts Tags” and both adding a tag and removing the follow-up tag. (Remember this tag is the condition of the Follow Up Segment we created). This will result in the contact not showing up in the Sales Agents Follow-Up Today segment.
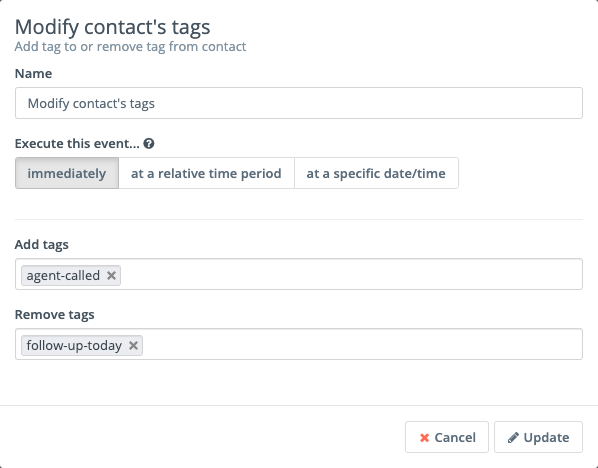
We then used another action of type “Modify Contacts Tags” with a wait period of X days before the Sales Agent Follow Up segment will be populated with that lead.
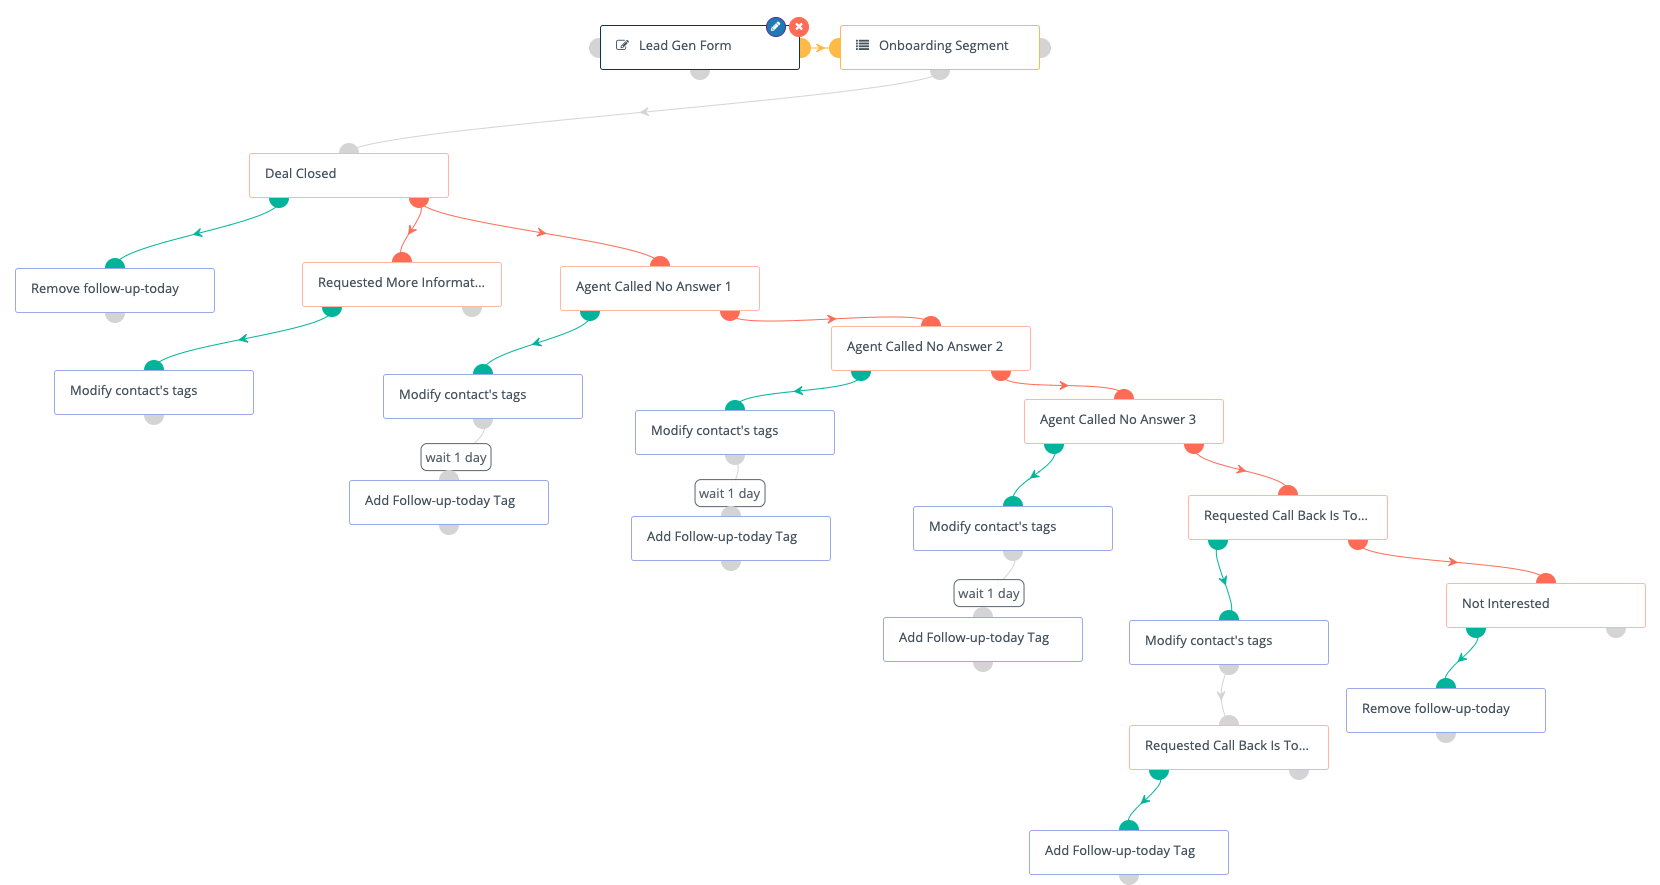
The only other adjustment to do is on the path “Requested Call Back” and here we added a condition based on the custom field “Requested Call Back” to determine when to re-add the “follow-up” tag.
Obviously there are user notifications that can be added to this campaign and there is room to extend and improve, but hopefully this will allow for a general understanding how Mautic can actually assist in the workflow of a sales cycle.